Monday, December 31, 2012

How to import FLAC to iTunes?

FLAC to iTunes Converter - How to Import and Add FLAC to iTunes on Windows and on Mac?


Tags: flac to itunes, import flac to itunes, add flac to itunes, transfer flac to itunes, convert flac to itunes, flac files to itunes, adding flac to itunes, importing flac to itunes, flac to itunes lion, flac to itunes mac os x, flac to itunes 11, flac to itunes 10.7, flac to mountain lion

FLAC format with the competitive features of providing marvelous audio quality as well as much smaller file size is well received among audiophiles. However, though FLAC is open-source and royalty-free format, it is not a compatible audio format with iTunes and with all Apple devices. In order to import FLAC to iTunes, import FLAC to iTunes 11/iTunes 10.7/iTunes10.6 and etc, iTunes Match, and stream FLAC to iCloud, a recommended solution is to convert FLAC to Apple friendly audio formats so that you can play FLAC with iTunes, iPad, the new iPad 3, iPhone and iPod, etc. 

If you care the quality of the output audio, converting FLAC to Apple Lossless audio is recommended. You can visit this guide for converting FLAC to Apple Lossless then import FLAC to iTunes for enjoy or for sync.

If you do not care about the quality of the music, you can convert FLAC to MP3, a versatile audio format across system and devices then import the converted FLAC files to iTunes.

Some people may have specific need to convert FLAC to WAV, M4A or AIFF for add FLAC to iTunes. This article will suite all of the needs and demands like a charm.

Step by Step Guide on How to Convert FLAC to Import FLAC to iTunes


Make preparation: Free Download Bigasoft FLAC to iTunes Converter. 

 
Free download Bigasoft FLAC to iTunes Converter (Mac Version, Windows Version). Install and fire up.

Introduction of Bigasoft FLAC to iTunes Converter

 
Bigasoft FLAC Converter is professional FLAC to iTunes Converter to convert FLAC to iTunes compatible audio formats MP3, M4A, AIFF, ALAC, WAV, etc. In addition to convert FLAC, it can also convert between almost all popular audio formats. FLAC Converter is powered with advanced functions such as trim, merge and split audio files as well as adjusting parameter to customize output audio.

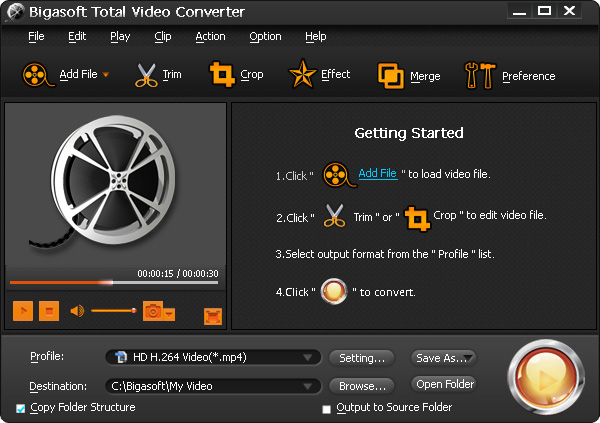
Step 1  Add FLAC files to FLAC Converter

 
Click the button of "Add Files" in the main menu to browse and open the FLAC files.

If you have lots of FLAC files, you can drag the folder where you FLAC files are to Bigasoft FLAC to iTunes Converter. It will automatically load all your music and video files in that folder.


Steps adding FLAC to iTunes


Step 2  Set output audio format and define destination folder

 
Take converting FLAC to M4A format for example. Click the "Profile" Drop-down list and search "m4a" in the "search profile" box. Select M4A - MPEG-4 Audio(*.m4a) as the profile.

Click "Browse..." to choose the folder where you want to put the converted FLAC files

Step 3  Edit FLAC files before converting (Optional)

 
To split FLAC files with CUE, in the task list, select the FLAC files and right click the mouse (Widows user) or press Ctrl and click the mouse (Mac users) to open the context menu. Click "Split by Chapter" in the context menu in the task list. The FLAC files will be automatically splitted to tracks.

To merge several FLAC files into one, in the task list, select the FLAC files that you want to merge into one file; then in the context menu, click "Merge Selected into one". The merged file will show like "MergeX.m4a". You can double click the name to rename the merged file.

To trim FLAC and keep excellent part, click "Trim" button to open the "Trim" Window. Listen the clip and set the starting time and ending time. Then click "OK" to apply the setting.

Step 4  Start FLAC to iTunes conversion

 
Click on the big blue "Convert" button to start FLAC to iTunes conversion.

Step 5  Import FLAC to iTunes

 
After conversion is done, click "Open Folder" beside "Destination" at the bottom of the software to open the converted FLAC files. Then drag and drop them to add FLAC to iTunes.

Resources

 
FREE Download and Start Enjoying Now (26.48MB)
Learn more about Bigasoft FLAC Converter for Mac ...
Got a PC? Free download your copy here (9.85MB)
Learn more about Bigasoft Audio Converter ...

Related Articles

 
How to convert FLAC to WAV?
How to Convert FLAC to Apple Lossless Audio?
How to Convert FLAC to MP3 on Mac or Windows
Convert and Play MKV in iTunes
How to Split FLAC files based on CUE on PC and Mac?
How to Import and Play WAV in iTunes, iPhone, iPod, iPad?
How to Convert and Import AVI to iTunes/iPad/iPhone/iPod/Apple TV?
How to Play FLAC in Car Stereo or Car Radio?
Solution on Can't Add Videos to iTunes 11
More Articles on Bigasoft.com ...
To find out more Bigasoft Solutions to enjoy your new digital life, you can go here.

How to Import AVI to iTunes to Transfer AVI to iPad/iPad 2/iPad 3?

Easy Solution to Convert and Import AVI to iTunes so as to Transfer AVI Files to iPad/iPhone/iPod successfully


Tags: import avi to itunes, how to import avi to itunes, transfer avi to ipad, avi to itunes converter, convert avi to itunes, add avi to itunes 11, avi to itunes, play avi in itunes, add avi to itunes

Overview


This article will describe a step by step guide on how to convert and import AVI files to iTunes. Then it is just easy to play AVI in iTunes or sync AVI video to iPad, iPad 2, iPad 3, iPad 4, iPad mini, iPhone 5, iPhone 4S, iPhone 4, iPhone 3GS, iPhone 3G, iPod, iPod Touch, Apple TV and more. It even helps to convert and import 1080p AVI to iTunes for play 1080p AVI in iTunes, iPad, iPod, iPhone and Apple TV.

Why Failed to Import AVI to iTunes


According to Apple official website, iTunes only works with QuickTime and MPEG-4 Movie files that end in ".mov", ".m4v", or ".mp4" and are playable in QuickTime Player. Therefore, if you try to import .avi movie to iTunes (including import AVI to iTunes 11) for syncing, it will end in fail in importing AVI video to iTunes let alone transfer this AVI file to iPad, iPhone, iPod.

How to Import AVI Video to iTunes successfully?


In order to successfully import AVI files to iTunes, we have to convert this AVI video to iTunes compatible video format like MP4. Bigasoft iPad Converter is just the right AVI to iTunes conversion software. It can easily convert AVI video file to iTunes supported MP4 format for transfer AVI to iPad, iPhone, iPod, Apple TV and more. This powerful AVI to iTunes Converter supports to convert and import AVI to any version of iTunes like import AVI to the new iTunes 11, AVI to iTunes 10.7.

Moreover, the powerful AVI to iTunes converter can convert other video formats including MPEG, MKV, WMV, WTV, 3GP, FLV, ASF, MTS, VOB, RM, RMVB, TS and more to iTunes format for transferring to iPad/iPhone/iPod/Apple TV. It also can convert audio files including WMA, OGG, FLAC, MP2, AC3, RA, M4B, AAC, CAF to iTunes supported MP3, AIFF, WAV or M4A audio format. It even can convert various video formats to iTunes audio format.

Step by step Guide on How to Import AVI to iTunes 


The following is a step by step guide on how to convert and import AVI to iTunes (iTunes 11 included) with the help of Bigasoft iPad Video Converter.

Make Preparation: Run Bigasoft iPad Video Converter


Free Download Bigasoft iPad Video Converter (for Windows , for Mac ) install and run it, the following interface will pop up.

AVI to iTunes Converter

Step 1 Add AVI video file


Click "Add File" button to import AVI video file. Or you can also drag your AVI file directly to the main interface of Bigasoft iPad Video Converter.

Step by step guide on how to convert AVI to iTunes format

Step 2 Set iTunes supported MP4 format 


Click the drop-down button on the right side of the "Profile" to set iTunes compatible MP4 format.
  • To transfer AVI to iPad, iPad2, iPad 3, iPad 4 or iPad mini by iTunes, select iPad MPEG-4 Video (*.mp4) from the "iPad" category. To play 1080p AVI on iPad, select iPad H.264 HD Video(*.mp4) from the "iPad" category.
  • To transfer AVI to iPhone 5/4S/4, iPhone 3GS, iPhone 3G, select iPhone MPEG-4 Video (*.mp4) from the "iPhone" category.
  • To transfer AVI to iPod classic, iPod nano, iPod touch, iPod touch 4, iPod touch 5, iPod shuffle, select iPod MPEG-4 Video (*.mp4) from the "iPod" category.
  • To transfer AVI to Apple TV, select Apple TV MPEG-4 Video (*.mp4) from the "Apple TV" category. To play 1080p AVI on the new 1080p Apple TV, select Apple TV H.264 HD Video(*.mp4) from the "Apple TV" category
  • Usually, the default output format is just iTunes supported one, to add AVI to iTunes only in order to play AVI in iTunes, just ignore this step

Step 3 Convert AVI to iTunes supported format


Click "Convert" button to finish converting AVI to iTunes compatible video format.

Step 4 Import AVI to iTunes


Start iTunes, and then choose File > Add File to Library to import the converted AVI files to iTunes or you also can simply drag and drop this converted AVI movie to the iTunes Movie Library.

How to import AVI to iTunes


Enjoy or Transfer AVI to iPad/iPhone/iPod/Apple TV


After finishing the conversion and importing, just enjoy your AVI movies on your iTunes or sync them to iPad, iPhone, iPod, Apple TV for watching AVI video on the go. Wait no more, just free download the powerful AVI to iTunes converter for importing AVI files to iTunes/iPad/iPhone/iPod/Apple TV.

Resources


FREE Download and Start Enjoying Now (7.75MB)
Learn more about Bigasoft iPad Video Converter ...

Got a Mac? Free download your copy here (20.80MB)
Learn more about Bigasoft iPad Video Converter for Mac ...

Related Articles


Convert and Play MKV in iTunes
Easy Way to Play Ogg in iTunes/iPod/iPhone/iPad
How to import FLAC to iTunes?
Easy Solution to Import AVI to iMovie
How to Successfully Burn AVI with iDVD?
Solution on Can't Add Videos to iTunes 11
More Articles on Bigasoft.com ...
To find out more Bigasoft Solutions to enjoy your new digital life, you can go here.


Wednesday, December 26, 2012

How to Split FLAC files based on CUE on PC and Mac?

FLAC CUE Splitter - Seamlessly Split FLAC as well as Convert FLAC Tracks on Mac and PC


Tags: flac cue splitter, split flac file, how to split flac files, how to split flac file, how to split flac file, split flac files, split flac cue mac, split flac, split flac cue, split flac mac, flac splitter, flac ripper

Overview


If your FLAC file is one big file which contains multiple tracks, for some reason you just need each song/music in single track. Now with the help of Bigasoft FLAC Splitter, it's just so easy to split FLAC files if your FLAC file is equipped or associated with a CUE file as well as convert FLAC files on Mac and PC.

About Bigasoft FLAC Splitter


Bigasoft FLAC Converter, working as a professional FLAC CUE splitter and FLAC Converter, can fast load numerous FLAC files and split them to multiple tracks based on associated .cue file in batch. In addition to split FLAC files, Bigasoft FLAC Converter can also convert the FLAC files to popular audio formats like M4A, WAV, 24 bit WAV, MP3 up to 320kbps, Apple Lossless ALAC, AIFF, OGG, etc.

Detailed guide on how to Split FLAC files based on CUE on Mac and PC and Convert to Desired Audio Format?


This article solves:
  • Split FLAC files and convert FLAC to MP3 or 320kbps MP3 in one step;
  • Split FLAC files and convert FLAC to WAV or 24 bit WAV in one step;
  • Split FLAC files and convert FLAC to ALAC in one step;
  • Split FLAC files and convert FLAC to M4A, OGG, AAC, etc in one step;
  • Split FLAC files to multiple single tracks in FLAC;
  • Split FLAC files and convert FLAC on Windows XP, Vista, Windows 7;
  • Split FLAC files and convert FLAC on Mac, OS X Lion.

Preparation: Download and install Bigasoft FLAC Splitter


Free download Bigasoft FLAC Converter (Mac Version, Windows Version). Install and launch it.

After installation, the Windows version FLAC Converter will launch automatically. For Mac users, you will need to go to Application to launch Bigasoft FLAC Converter.

Step 1  Load FLAC files


Click "Add files" to browse and open FLAC files which you want to split and convert.

Split FLAC Easy Steps

Step 2  Split FLAC files


After all your long FLAC files are loaded, select all your FLAC files (press Ctrl+A or Command on Mac computer).

Open the context menu.

For Windows users, right click the mouse to open the context menu.

For Mac users, press Ctrl and click the mouse to open the context menu.

Click "Split by Chapter" in the context menu in the task list, the long and large FLAC files will be automatically split to tracks.

FLAC CUE Splitter - Split FLAC with CUE

Tips: To ensure Bigasoft FLAC Converter can split your FLAC files, the .cue files shall be in the same folder with your FLAC files.

Now the FLAC files are split to multiple tracks.


Splitting FLAC files


Step 3  Set desired output audio format for converting FLAC to


Take converting FLAC to ALAC format for example. Click the "Profile" Drop-down list and search "alac" in the "search profile" box. Select ALAC - Apple Lossless Audio Codec (*.m4a) as the profile. Click "Browse" to choose the folder where you want to put the converted FLAC files.

To convert FLAC to 320kbps MP3, after setting profile as MP3 - MPEG Layer-3 Audio (*.mp3), click "Settings" to open the "Advanced Setting" window and adjust audio bitrate to 320.

To convert FLAC to 24bit WAV, after setting profile as WAV - Waveform Audio (*.wav), click "Settings" to open the "Advanced Setting" window and change audio codec to pcm_s24le.

Step 4  Start Splitting FLAC files


Press on the big blue "Convert" button. Bigasoft FLAC Converter will start splitting FLAC to single tracks as well as convert FLAC to desired audio formats.

Conclusion


It is just that easy to convert and split FLAC on Mac and PC. Not only can Bigasoft FLAC Converter split and convert FLAC files, it also supports splitting and converting many other audio formats as you wish. Free download your copy to start enjoy now.

Resources


FREE Download and Start Enjoying Now (26.48MB)
Learn more about Bigasoft FLAC Converter for Mac ...
Got a PC? Free download your copy here (9.85MB)
Learn more about Bigasoft Audio Converter ...

Related Articles


How to convert FLAC to WAV?
How to import FLAC to iTunes?
How to Convert FLAC to Apple Lossless Audio?
CUE splitter for Mac - Split/Cut CUE based MP3, APE, WAV on Mac OS X

More Articles on Bigasoft.com ...
To find out more Bigasoft Solutions to enjoy your new digital life, you can go here.


How to Increase Audio Volume Video AVI, WMV, MP4, FLV, YouTube, etc?

Increase Audio Volume Video as well as Convert to Other Video/Audio Formats.


Tags: increase volume video, increase sound volume, increase audio volume, avi, wmv, mp4, flv, youtube, mkv, dvd, vob

Overview


Ever been in this situation: even with the volume in the highest level, it sill sounds very slight? Ever thought to increase sound volume in video or audio so as to enjoy it even in noise environment? In fact, it is very easy to do that as long as you own Bigasoft Total Video Converter.


Increase Volume Video


Bigasoft Total Video Converter


Bigasoft Total Video Converter offers one step solution to convert between various video/audio like AVI, MP4, WMV, FLV, as well as to increase audio volume from video.

Bigasoft Total Video Converter supports video converting, audio extracting, and video editing in various video files including AVI, Xvid, DivX, H.264, MP4, 3GP, MKV, WMV, RM, FLV, MOV, WebM and more. It supports trim, cropping, adding video effects and adjusting audio volume before converting to desired video and audio formats.

Bigasoft Total Video Converter can increase volume of video in various video formats and increase sound volume of audio in various audio formats and save it to ideal video and audio format.

Detailed Guide on How to Increase Volume of Video/Audio


This article solves:
  • Extract audio from video and increase audio volume in one step
  • Convert video to desired video format and increase volume video in one step
  • Convert audio to desired audio format and increase audio volume in one step
If you are looking for software for increasing audio volume without encoding, this article will not suit you.

Step 1 Free download Bigasoft Total Video Converter and run it

 
Free download Bigasoft Total Video Converter (Windows Version, Mac Version), install and run it.

Step 2 Add files that are in low volume


Click "Add File" button to add files that are in low volume. "Open".

Guide on How to Increase Audio Volume

Step 3 Adjust audio volume and prelisten whether it is in best fit


Press "Setting..." button, the "Advanced Settings" Window will pop up right beside the main window. In the "Advanced Settings" Window, click "Advanced" tab, and then go to "Audio" column, click 100% tab on the right side of volume, and choose volume ratio from the drop-down list. For setting higher or lower volume or setting any volume ratio, just enter the desired volume ratio like 300%, 400%.

 Adjust Video Volume

Step 4 Set output video/audio formats


Click the small triangle to the right of Profile, a drop down menu will pop up, then select wanted output video format like AVI - Audio - Video Interleaved (*.avi) or MPEG4 Video(*.mp4) and more.

Step 5 Video edit (Optional)


Press Trim button to trim wanted video clip by setting the start time and end time.

Press Crop button to crop unwanted video part.

Press Effect button to customize video like adding watermark, subtitle, audio track, artistic effects.

Click Preference button to set preferred output video folder, output snapshot folder, image type, after conversion done action, CPU usage etc.

Click Setting button to set output video size, video quality, audio quality, adjust audio volume, and choose audio channel and more.

Step 6 Convert


Click Start button to finish video format conversion and the increase of audio volume.

Conclusion


It is just so easy to increase volume video/audio with the above detailed guide. Besides increase volume of video/audio, the software in this guide even can rotate video, add audio track and subtitle for video, increase artistic effects for video, add image or text watermark for video, split video, merge videos into one, trim and crop video, capture preferable picture from video and more. Just get this ideal video converter and enrich your video world.

Resources 


FREE Download and Start Enjoying Now (10.53MB)
Learn more about Bigasoft Total Video Converter ...
Got a Mac? Free download your copy here (26.86MB)
Learn more about Bigasoft Total Video Converter for Mac ...
FREE Download and Start Enjoying Now (10.53MB)
Learn more about Bigasoft DVD Ripper ...
Got a Mac? Free download your copy here (27.50MB)
Learn more about Bigasoft DVD Ripper for Mac ...

Related Articles

 
How to crop videos?
How to Add Subtitles SRT/ASS/SSA/SUB/IDX to AVI?
How to Compress Video MKV, AVI, MP4, MPEG, MOV, FLV, WMV, VOB?

More Articles on Bigasoft.com ...
To find out more Bigasoft Solutions to enjoy your new digital life, you can go here.


How to Compress Video AVI, MP4, MPEG, MKV, WMV, MOV, FLV, VOB?

Powerful Video Compressor to Reduce the File Size of Various Video


Tags: mxf to final cut, mxf to fcp, mxf to mov, convert mxf to mov, mxf to mov converter, mxf to apple prores mov, mxf files final cut, mxf to fce, import mxf to final cut pro, mxf to dv, mxf to hd h.264 mpeg4
 
When try to upload video to YouTube, Vimeo and other video sites or send video by email, only to find the video file size is too large to upload or send. And in this case, we need to compress the video to a smaller file size. Though there are many Video Compressors, they either compress video in poor output quality or support few video formats.

This article just aims to introduce a powerful video compressor and a step by step guide on how to reduce the file size of various video with almost no loss of video quality.

Introduction of the Powerful Video Compressor


Besides acting as a professional video converter, Bigasoft Total Video Converter is also a powerful video compressor which can fast and easily compress all popular video to a smaller file size with high output video and audio quality. It can not only compress video to remain the same output video format, but also compress video to get a different output video format.

This powerful Video Compressor supports compress video in whatever video formats like compress AVI, compress MP4, compress MPEG, compress MKV, compress MOV, compress FLV, compress WMV, compress VOB, compress AVCHD, compress 1080p, compress MPEG2 and etc.

Step by Step Guide on How to Compress Video?


The following will introduce a step by step guide on how to compress MKV, MPEG, AVI, MP4, WMV, MOV, VOB, FLV, MPEG2 and more video with the help of the powerful Video Compressor.

Make Preparation: Run Video Compressor


Free download the powerful Video Compressor - Bigasoft Total Video Converter (for Windows, for Mac), install and run it, the following interface will pop up.


The Powerful Video Compressor

Step 1 Add video which you want to compress


Click "Add File" button to add the video file which you want to compress. (This ideal video compressor supports to compress MPEG, MKV, MP4, AVI, MOV, MPEG2, MOV, VOB, FLV, 1080p, AVCHD, WTV, MXF, MVI, and more video formats.)

How to Compress MKV, AVI, MP4, MPEG, MOV, FLV, WMV, VOB?

Step 2 Set output video file size and quality


Method 1: Set the output video format as H.264 MP4
 
Click the small triangle to the right of "Profile" to select H.264/MPEG-4 AVC Video(*mp4) as the output video format.

Tips:
  • This method suits the video you want to compress is in MKV, MPEG, WMV, VOB, MOV, DV, HDV, AVCHD, MXF, MVI, FLV and more video format, and your media player, portable digital device, or video editing software supports to play or edit H.264 MP4.
  • It also suits the video you want to compress is used to upload to YouTube, Vimeo and other video sites or send by email.
  • This method can compress video to relative small file size as well as keep the output video in relative high quality. To keep the output video format the same as the original video format or to compress video to much smaller file size, you may refer to method 2.
Method 2: Set desired output video bitrate
 
Click "Setting..." button, the "Advanced Settings" Window will pop up right beside the main window. In the "Advanced Settings" Window, click "Advanced" tab, and then go to "Video Bitrate" column, click 1200 tab on the right side of "Video Bitrate", and choose desired video bitrate from the drop-down list. It is also allowed to overwrite any desired bitrate like 325,350.

After setting the desired output video bitrate, you can click the small triangle to the right of "Profile" to select preferable output video format just like the above method 1: You can either keep the output video format the same as the original video format or change the output video format to any other video format like MP4, AVI, MOV, WMV, MPEG, MKV, VOB, FLV, WebM and so on.

Tips:
  • This method suits to compress video in whatever format.
  • This method can reduce the video file to any desired video file size
  • A bitrate of 300-350 is about okay for a web video. Usually the smaller the bitrate, the more you compress the video and the worse the video quality gets. So it is recommended to balance between video file size and quality.


Step 3 Compress video


Click "Convert" button to start and finish compressing video to a smaller video file size.

Conclusion


It is just easy to reduce the video file size with the above powerful Video Compressor and the step by step video compression guide. Wait no more, just free download this ideal Video Compressor to compress MP4, MPEG, MKV, AVI, WMV, MOV, VOB, FLV, AVCHD, and more video for uploading to YouTube, Vimeo and other video sites or for sending by email.

Resources


FREE Download and Start Enjoying Now (10.53MB)
Learn more about Bigasoft Total Video Converter ...
Got a Mac? Free download your copy here (26.86MB)
Learn more about Bigasoft Total Video Converter for Mac ...

Related Articles


How to Compress Audio WAV, MP3, FLAC, WMA, M4A, AIFF, PCM and etc?
Convert and Compress Fraps to AVI, MP4 for YouTube and iMovie
How to Add Subtitles SRT/ASS/SSA/SUB/IDX to AVI?
How to Adjust Audio Volume When Converting
How to Split Audio/Video by Chapter Markers

More Articles on Bigasoft.com ...
To find out more Bigasoft Solutions to enjoy your new digital life, you can go here.

Tuesday, December 25, 2012

How to Fix Audio Video out of Sync Issue after Conversion, Trimming and Merging?

 How to synchronize audio and video after conversion?


Tags: audio video out of sync, fix audio sync, sync audio and video, synchronize audio and video, audio video synchronization, lip sync error, audio video out of sync after conversion, audio video not match, audio lag behind of video

Overview

 
It will be very much annoying if the audio/sound/music is behind or ahead of a video/image/graphic, even if it is only for two or one second. If you are encountering audio video sync issue (also called the lip sync error) when trying to convert your video either in WTV, MKV, AVI, MOV, WMV, WebM, HD, AVCHD MTS, etc using Bigasoft converter or converters from other brand, you can follow the tips to fix the audio video out of sync issue.

Resolution: Step-by-Step Guide to Fix Audio Video Out of Sync after Conversion

 
This resolution works for:
  • Source video files with audio and video are correctly synced but out of sync after conversion. The resolution will not work if the audio and video of your source files do not match.
  • Audio lags behind of video when using the trim, merge features of Bigasoft Converter or converters from other brand.
  • Audio and video do not match after conversion using converters of other brand like the free VLC, MPEG Steam.
This resolution applies to:

All Bigasoft Converters like Total Video Converter, WTV Converter, iMovie Converter, iPad Video Converter, iPod Video Converter, WMV Converter, AVI Converter, MP4 Converter, etc.

Preparation: 


Free download Bigasoft Total Video Converter (Windows Version, Mac Version), install and run it.
This step is optional. If you already downloaded a converter from Bigasoft, you do not need to download it again.

If you use Bigasoft converter with version earlier than 3.6.19.4501, you will need to free update to latest version from Bigasoft Download Center.

Bigasoft Total Video Converter provides professional solutions for various video conversion, audio conversion and video to audio conversion, as well as advanced features like trim, crop, merge, deinterlace and split videos and more. In addition, Bigasoft Total Video Converter can be used to fix audio and video out of sync after conversion from MKV, MTS, WTV, WMV, WebM, FLV, AVI, MP4, VOB and any other video formats to MP4, AVI, WMV, etc.

Step 1 Add your source files

 
Click "Add File" to add your source files or simply drag and drop the files to Bigasoft Converter.


How to sync audio and video
 

Step 2 Choose output video format

 
For example, if you want to convert WTV to H.264 MP4 format, please choose the profile as " H.264/MPEG-4 AVC Video (*.mp4)" from the "Profile" Drop-down list.

Step 3 Edit before convert (Optional)

 
Press Trim button to trim wanted video clip by setting the start time and end time.

Press Crop button to crop unwanted video part.

Press Effect button to customize video like adding watermark, subtitle, audio track, artistic effects.

Click Setting button to set output video size, video quality, audio quality, adjust audio volume, and choose audio channel and more.

Step 4 Adjust av sync to fix audio sync issue

 
Click "Settings..." right beside Profile list to open the "Advanced Setting" Window.

Go to "Advanced" tab. You will see three categories including "Video", "Audio" and "Expert".

In the "Expert" category, click "+" to expand the "Expert" items.

Find "async" and set the value as "1".

Click "Apply to All" to save the setting.


Fix audio video out of sync


Tips:

In the "Advanced Setting" Window, you can also set output video size, video and video quality, adjust audio volume, and choose audio channel and more.

You can save the customized profile for later use by clicking on "Save As..." and name the profile.

Step 4 Convert

 
Click the big blue convert button at the bottom of the software interface to start convert.

Conclusion

 
After setting the av sync value to "1" in the "Advanced Setting" window in Bigasoft Converter, you will find trimming, merging and converting your video files to any desired video format will be perfectly in sync of audio and video. It's just that easy.

Resources

 
FREE Download and Start Enjoying Now (10.53MB)
Learn more about Bigasoft Total Video Converter ...
Got a Mac? Free download your copy here (26.86MB)
Learn more about Bigasoft Total Video Converter for Mac ...

Related Articles

 
Convert HD WTV to AVI, MP4, MKV, WMV, MPG and MOV
How to Play WTV on Mac, Windows 8/XP/Vista, iPad, iPhone, PS3, Android, iPod?

More Articles on Bigasoft.com ...
To find out more Bigasoft Solutions to enjoy your new digital life, you can go here.

Monday, December 24, 2012

How to make iPhone ringtone longer than 40 seconds

Tags: iphone ringtone, iphone ringtone maker, itunes, 30 seconds, 40 seconds, iphone 5, iphone 4s, iphone 4, iphone 3g, iphone 3gs

Background

 
All ringtones in iTunes must be 40 seconds or less in length. For example, if your ringtone is 60 seconds long, it will not be recognized by iTunes as ringtone (all the ringtones shows up under iTunes sync settings for Ringtones).

Is it really impossible to break the 40 seconds limitation of iPhone ringtone? Of course NOT. Here is a step to step guide. It's dead easy.

This article works for all types of iPhone, including iPhone 5, iPhone 4S, iPhone 4, iPhone 3GS and iPhone 3G.

Step 1 Make a short ringtone

 
Firstly, you need make a short ringtone and hire iTunes to sync for you.

Free download and install Bigasoft iPhone Ringtone Maker (for Windows, for Mac), and then launch the software.

Locate the song you want to make into a long ringtone in your music collection or in iTunes. Drag the song to the iPhone ringtone maker.

Make sure the duration of ringtone is less than 40 seconds.

Uncheck "Export to iPhone", check "Export to iTunes", and click "Generate".

Make a short ringtone

Step 2 Sync with iTunes

 
Connect iPhone to your computer, open iTunes if it doesn't automatically open, select the iPhone icon in the Source pane, click the Ringtones tab and then make sure the "Sync Ringtones" option is checked.

Click the "Sync" button in iTunes.

Sync with iTunes

Step 3 Make a long ringtone

 
Set the Start Time and the End Time by drag and release on slider to where you want to go over the 40 seconds limit.

Please uncheck both "Export to iPhone" and "Export to iTunes", and click "Generate".

The ringtone maker software will generate a long ringtone for you.

Make a long ringtone

Step 4 Break the 40 seconds limitation!

 
Click "Manage", select the name of short ringtone, and click "Replace" button.

Locate the long ringtone generated by Step 3; the file name is something like "Just Dance(1)", and click "Open".

It's that simple.

Break the 40 seconds limitation!

Step 5 Enjoy your iPhone ringtone

 
Tap on the "Sounds" icon in the Settings menu in your iPhone, then tap on the "Ringtone" icon, you can see a list of your available ringtones. Your new custom ringtone made with Bigasoft iPhone Ringtone Maker stays there. Enjoy the ringtone longer than 40 seconds now!

Resources

 
FREE Download and Start Enjoying Now (8.39MB)
Learn more about Bigasoft iPhone Ringtone Maker ...
Got a Mac? Free download your copy here (20.00MB)
Learn more about Bigasoft iPhone Ringtone Maker for Mac ...

Related Articles

 
How to Make Text Tones for iPhone 5/4S/4/3GS/3G?
More Articles on Bigasoft.com ...
To find out more Bigasoft Solutions to enjoy your new digital life, you can go here.

Thursday, December 20, 2012

How to stream video from PC/Mac to Apple TV?

Step-by-Step Guide to Stream video in MKV,AVI,WMV,DivX,MPEG from PC to Apple TV or from Mac to Apple TV


Tags: stream video from pc to apple tv, stream video from mac to apple t, stream video from windows to apple tv, stream video from computer to apple tv, stream avi to apple t, stream mkv to apple t, stream mpg to apple t, stream divx to apple tv

Overview 

 
AirPlay, developed by Apple Inc. makes it possible for us to wirelessly stream video from PC to Apple TV/Apple TV 3/Apple TV 2 and stream video from Mac to Apple TV/Apple TV 3/Apple TV 2 to watch movies on the wide screen HD TV.

However, Airplay is limited to many video formats. Airplay can only work with those files that can be added to iTunes including MP4, MOV, and M4V. Any format iTunes cannot support like AVI, MKV, WMV, DivX, XviD, MPEG, and FLV video format, Airplay will not steam. Even you steam your video by the help of some Airplay app; problems always occur when playing the movie files, such as airplay only audio and no video at all.

This article introduces an easy way to steam various video such as stream AVI, MKV, DivX, XviD, MP4, MOV, MPG, F4V, FLV, 3GP, MTS, M2TS, MOD, TOD, WebM, OGM, MXF, WTV etc from Widows PC to Apple TV and from Mac computer to Apple TV.

This guide is applied for:
  • Stream video in AVI, MKV, DIVX, XVID, MPG, WMV, etc from Mac/iMac/MacBook to Apple TV via Airplay
  • Stream video in AVI, MKV, DIVX, XVID, MPG, WMV, etc from PC to Apple TV via Airplay
  • Convert HD video, AVCHD video to 720p to stream AVCHD, HD from PC/Mac to Apple TV/Apple TV 2 via Airplay
  • Convert HD video, AVCHD video to 1080p to stream AVCHD/HD video from PC/Mac to Apple TV 3 via Airplay

Make Preparation: Run Bigasoft iTunes Video Converter


Free download the professional Bigasoft iTunes Video Converter - Bigasoft iTunes Video Converter (Mac Version, Windows Version), install and launch it.

Bigasoft iTunes Video Converter is professional all-in-one converter for iTunes! Benefiting from the most advanced conversion and efficient performance technology, Bigasoft iTunes Video Converter can convert various videos to iTunes video MP4, MOV with fast speed and high graphic and sound quality. Adding any movie files to iTunes 10.6 and the earlier version iTunes is never so fast and easy! It optimizes ready high quality video for all models and all types of Apple devices including iPod, iPhone, iPad and Apple TV.

Step 1 Add files


Click "Add File" button to import files that Airplay cannot stream. 

Step 2 Set output profile


There are several situations according to your source video and how you choose to airplay your videos.
  • To stream stand definition AVI, XVID, DIVX, WMV, etc from Mac/iMac/Mac book/PC to Apple TV/Apple TV 2/Apple TV 3 via AirPlay, select Apple TV H.264 Video (*.mp4) from "Apple TV" category in the "Profile" drop-down.
  • To stream HD, AVCHD video from Mac/iMac/Mac book/PC to Apple TV or Apple TV 2 via AirPlay, select Apple TV H.264 HD Video (*.mp4) from "Apple TV" category in the "Profile" drop-down.
  • To AirPlay 1080p video to the new Apple TV 3, select Apple TV 3 H.264 1080p Video (*.mp4) from "Apple TV"category in the "Profile" drop-down.
 

  Step 3 Start Conversion

Click the button of "Convert" button to finish the conversion. 

Step 4 Stream the converted video files from your PC/Mac/iMac/Macbook to Apple TV


To Airplay movies from PC/Mac/iMac/Macbook to Apple TV, when the conversion is complete in Step 2, click "Open Folder" to locate the converted video files.

Start iTunes, and then choose File -> Add File to Library to import the converted video files to iTunes or simply drag and drop the converted files to the iTunes Movie Library.

Hit on "Play Movie" button in iTunes. The movie will start playing. You'll notice an AirPlay icon AirPlay iconin the bottom right corner of the iTunes application show up. Click it, select "Apple TV" and your video will begin streaming from Mac/iMac/Macbook/PC.


Conclusion


To airplay AVI, MKV, DivX, MP4, MOV, FLV and other Apple TV won't support format video from PC to Apple TV and from Mac to Apple for playing on television is so easy with the help of Bigasoft iTunes Video Converter. Free download the program now to enjoy fantastic movies right now. 

Resources


FREE Download and Start Enjoying Now (27.92MB)
Learn more about Bigasoft iTunes Video Converter for Mac ...
Got a Windows? Free download your copy here (10.78MB)
Learn more about Bigasoft iTunes Video Converter ...

MP4 to MOV, MP4 to DivX: Convert MP4 file to MP4 and convert MP4 file to DivX to play MP4 on DVD Players


Tags: dvd player plays mp4, dvd player mp4, dvd player mp4 playback,mp4 to dvd player,mp4 to divx, convert mp4 to divx, mp4 to divx hd, mp4 files to divx, play mp4 on dvd player, mp4 to mov, convert mp4 to mov, burn dvd, hd dvd player, blu-ray disc dvd player


 Overview


MP4 format is the most widely used video format and compatible with a great variety of digital players and devices including iPod, iPad, iPhone, BlackBerry, Apple TV, Zune, PSP, PS3, Pocket PC, Archos and so on. However, MP4/MPEG-4/H.264 MP4 is not coded in many DVD players and some of its successors like HD DVD players, Blu-ray disc players and 3D DVD players due to the different codec. Even some DVD players are claimed to support MP4, due to specific codec required, some MP4 files still will not be played.

Is there no way to enjoy MP4 on DVD players if your DVD player cannot play MP4 files? In fact, it is just easy to play MP4 on DVD player by the help of Bigasoft Total Video Converter. By converting MP4/MPEG-4/H.264 MP4/HD MP4 to MOV, DivX/DivX HD, you can realize to watch the incompatible MP4 on DVD player/HD DVD player/Blu-ray Disc player with best quality.

The article solves:

·   Convert MP4 to DivX, HD DivX and convert MP4 to MOV to solve problem of "DVD Player/ HD DVD player/Blu-ray Disc player cannot playback MP4 files". To convert MP4 to DivX, HD DivX, your DVD players need to be "DivX Certified" that is to say DivX shall be supported by your DVD players.

·   Convert MP4 to MOV and convert MP4 to DivX or HD DivX for various any other uses.

Detailed Guide: How convert MP4 to DivX, HD DivX and convert MP4 to MOV to Play MP4 on DVD Players/HD DVD player/Blu-ray Disc player?


Make Preparation:  Free Download Bigasoft MP4 to DivX and MP4 to MOV Converter


Free download Bigasoft Total Video Converter (Mac version at http://www.bigasoft.com/downloads/b-total-video-converter-mac.dmg, Windows version at http://www.bigasoft.com/downloads/b-total-video-converter.exe).  Launch it and run.

Bigasoft Total Video Converter is the professional and ideal MP4 to DivX Converter, MP4 to MOV Converter, and MP4 to DivX HD Converter. It can fast convert MP4 to DVD Player compatible DivX , MOV and HD DVD player /Blu-ray Disc player compatible DivX HD. In addition, it can also perfectly convert to DivX from all kinds of video formats like AVI, WMV, Xvid, MKV, and MTS as well as convert between all popular video formats. The MP4 to DivX Converter is also built in a video editor, so you can trim, crop, merge video clips and convert to wanted formats.

 Bigasoft Total Video Converter: Step-by-Step Guide to Convert MP4 to DivX, DivX HD and Play MP4 on DVD Players

Step 1 Load MP4 files


Click "Add files" button to add MP4 files to MP4 to DivX and MP4 to MOV Converter.

You may also simply drag and drop your MP4 files to the program interface.

MP4 to DivX: Convert MP4 files to DivX to play MP4 on DVD Player? 


 Step 2 Set MOV, DivX or DivX HD Video as the output format


Click the small triangle to the right of "Profile" and set "DivX Video (*avi)" as the output format from "General Video" catalogue.

Click the small triangle to the right of "Profile" and set "MOV-QuickTime (*mov)" as the output format from "General Video" catalogue.

To play HD MP4 on HD DVD player or Blu-ray disc Player, choose "DivX HD Video (*.avi) " from the "HD Video" category.

To play HD MP4 on HD DVD player or Blu-ray disc Player, choose "HD QuickTime Video (*mov)"  from the "HD Video" category.

You can also customize output video quality in the "Advanced Setting Window" by click "Setting..." button to change video bitrate, aspect ratio, keep video quality as true and so on.

Tips:

Choosing MOV or DivX as the output format depends on the specification of the DVD Players. If the DVD Player supports SD Card and the DVD Player supports DivX, converting MP4 to DivX and copying the converted DivX file to SD Card to play on the DVD Player is a good choice. If DVD Player does not support DivX and SD Card, it will be better to burn the MP4 file or convert MP4 to MOV to burn the MOV file to DVD to play it on DVD Player.

Step 3: Convert MP4 to DivX or Convert MP4 to DivX HD or convert MP4 to MOV


Click "Convert" button to convert your MP4 files to DivX or DivX HD or MOV.

Click "Open Folder" button to locate the converted MP4 files when your conversion is done.

Step 4 Watch the converted MP4 to DivX files on DVD players/HD DVD players/Blu-Ray disc players


Conclusion


Bigasoft Total Video Converter is the ideal choice for you to convert MP4 to MOV, convert MP4 to DivX or convert MP4 to DivX HD to play MP4 on DVD Player/HD DVD player/Blu-ray Disc player. With the professional MP4 to DivX Converter and MP4 to MOV Converter, watching MP4 files on DVD Player will not be a trouble any more. Free download the trial version of Bigasoft MP4 to DivX Converter to convert MP4 to DivX and convert MP4 to MOV now to start enjoy.

For more information, please visit:
http://www.bigasoft.com/articles/how-to-convert-mp4-to-divx-to-play-on-dvd-players.html

 Resources


FREE Download and Start Enjoying Now (26.86MB)
Learn more about Bigasoft Total Video Converter for Mac ...
Got a Windows? Free download your copy here (10.53MB)
Learn more about Bigasoft Total Video Converter ...